Posts Tagged macOS
Arithmancy Pants for macOS and iOS: Because everything’s a magic number if you’re brave enough
Posted by Angela Brett in My Software on October 31, 2025
TL;DR: I made an app to derive a lot of ‘lucky’ numbers from any text. You can get it on the App Store now, for iOS and macOS.
Many years ago I came across Uri Geller’s page about how he notices the number 11 a lot and it’s somehow a magic number. I didn’t read all of it, because it’s nonsense, but I was intrigued by the list of ‘Names, events and places that add up to 11 letters.’ It contains:

- Many words, names, and phrases that happen to have 11 letters
- The words ‘hell heaven’ that sound a bit like 11
- Events that happened on the 11th of some month, or in November, or at 11:11
- The fact that Queen Elizabeth II is often written EIIR, which looks like E11R (of course, if you know Roman numerals, it clearly means E2R, but when I was a little kid I thought the Commodore 64 game Saboteur II was Saboteur 11, so I shouldn’t judge)
- Numbers whose digits add up to 11, if you keep adding the digits of the result until you get to 11
- Dates whose digits add up to 22, if you keep adding the digits of the result until you get to 22
- Phrases that have two consecutive As in them (because A is the first letter of the alphabet)
- Numbers that have two or more consecutive 1s in them
- Numbers that have two or more non-consecutive 1s in them, separated by zeroes
- Numbers that have 2 in them
It was clear to me that if you look hard enough, you can find 11s anywhere. Not only that, but you could find whatever other smallish (under 1000 or so) numbers you’re looking for. So I wrote code to look for a lot of these things automatically, and put it in an iOS and macOS app called Arithmancy Pants. It’s called that because ‘Numerologist’ was taken, arithmancy is an older word for numerology, and I’m a two-time Fancy Pants Parade winner.
I broke down everything into independent steps, so that we can find as many numbers as possible without doing the same thing twice — for instance, instead of converting AA to 11, we first convert it to 1, 1, and then concatenate them in a separate step to make 11.
Here are the things Arithmancy Pants can do in its quest to find numbers:

- Convert text into numbers
- by converting letters to their positions in the alphabet — Uri only uses this one for converting A to 1, but I’ve seen it quite often elsewhere
- by taking the number of letters in each word — this covers all the 11-letter words, and when combined with ‘adding up all the numbers’, covers other names and phrases with 11 total letters.
- by finding numbers that are already in the text, and letters that look like numbers — this covers the EIIR example.
- Convert numbers into other numbers
- By adding up the digits until they sum to a single digit (also known as digital root, this is equivalent to finding the remainder when dividing the number by 9, except using 9 instead of 0 unless we started at 0.)
- By converting each number into Roman Numerals — I think I only added this because I’d already written code to do that for something else. However, this covers the ‘numbers that have 2 in them’ case, as we can convert 2 to 11 by converting it first to II, and then to 11 by converting letters that look like numbers. This is a much more manageable way of turning 2 to 11 than adding a generic ‘convert each number into every possible combination of numbers that add to that number’ step.
- By adding up numbers
- Adding up all the numbers — this covers most of the adding-up cases on Uri’s page
- Adding up numbers in groups of up to 2, 3, 5, 7, and 11 numbers. By using prime-sized groups, in multiple steps we can add the numbers in groups of any size — e.g., we can add up groups of 6 numbers by first adding groups of 3 numbers, then adding those results in groups of 2.
- By concatenating numbers — combined with converting letters to their positions in the alphabet, this covers converting AA to 11
- Concatenating all the numbers
- Concatenating numbers in groups of up to 2, 3, 5, 7, and 11 numbers.
I stop at combining groups of 11, because while I could handle even larger numbers internally by using a different data type:
- I’ve got to stop somewhere, and not many people’s supposed lucky numbers have enough digits for concatenations or sums of multiples of 13 numbers to matter.
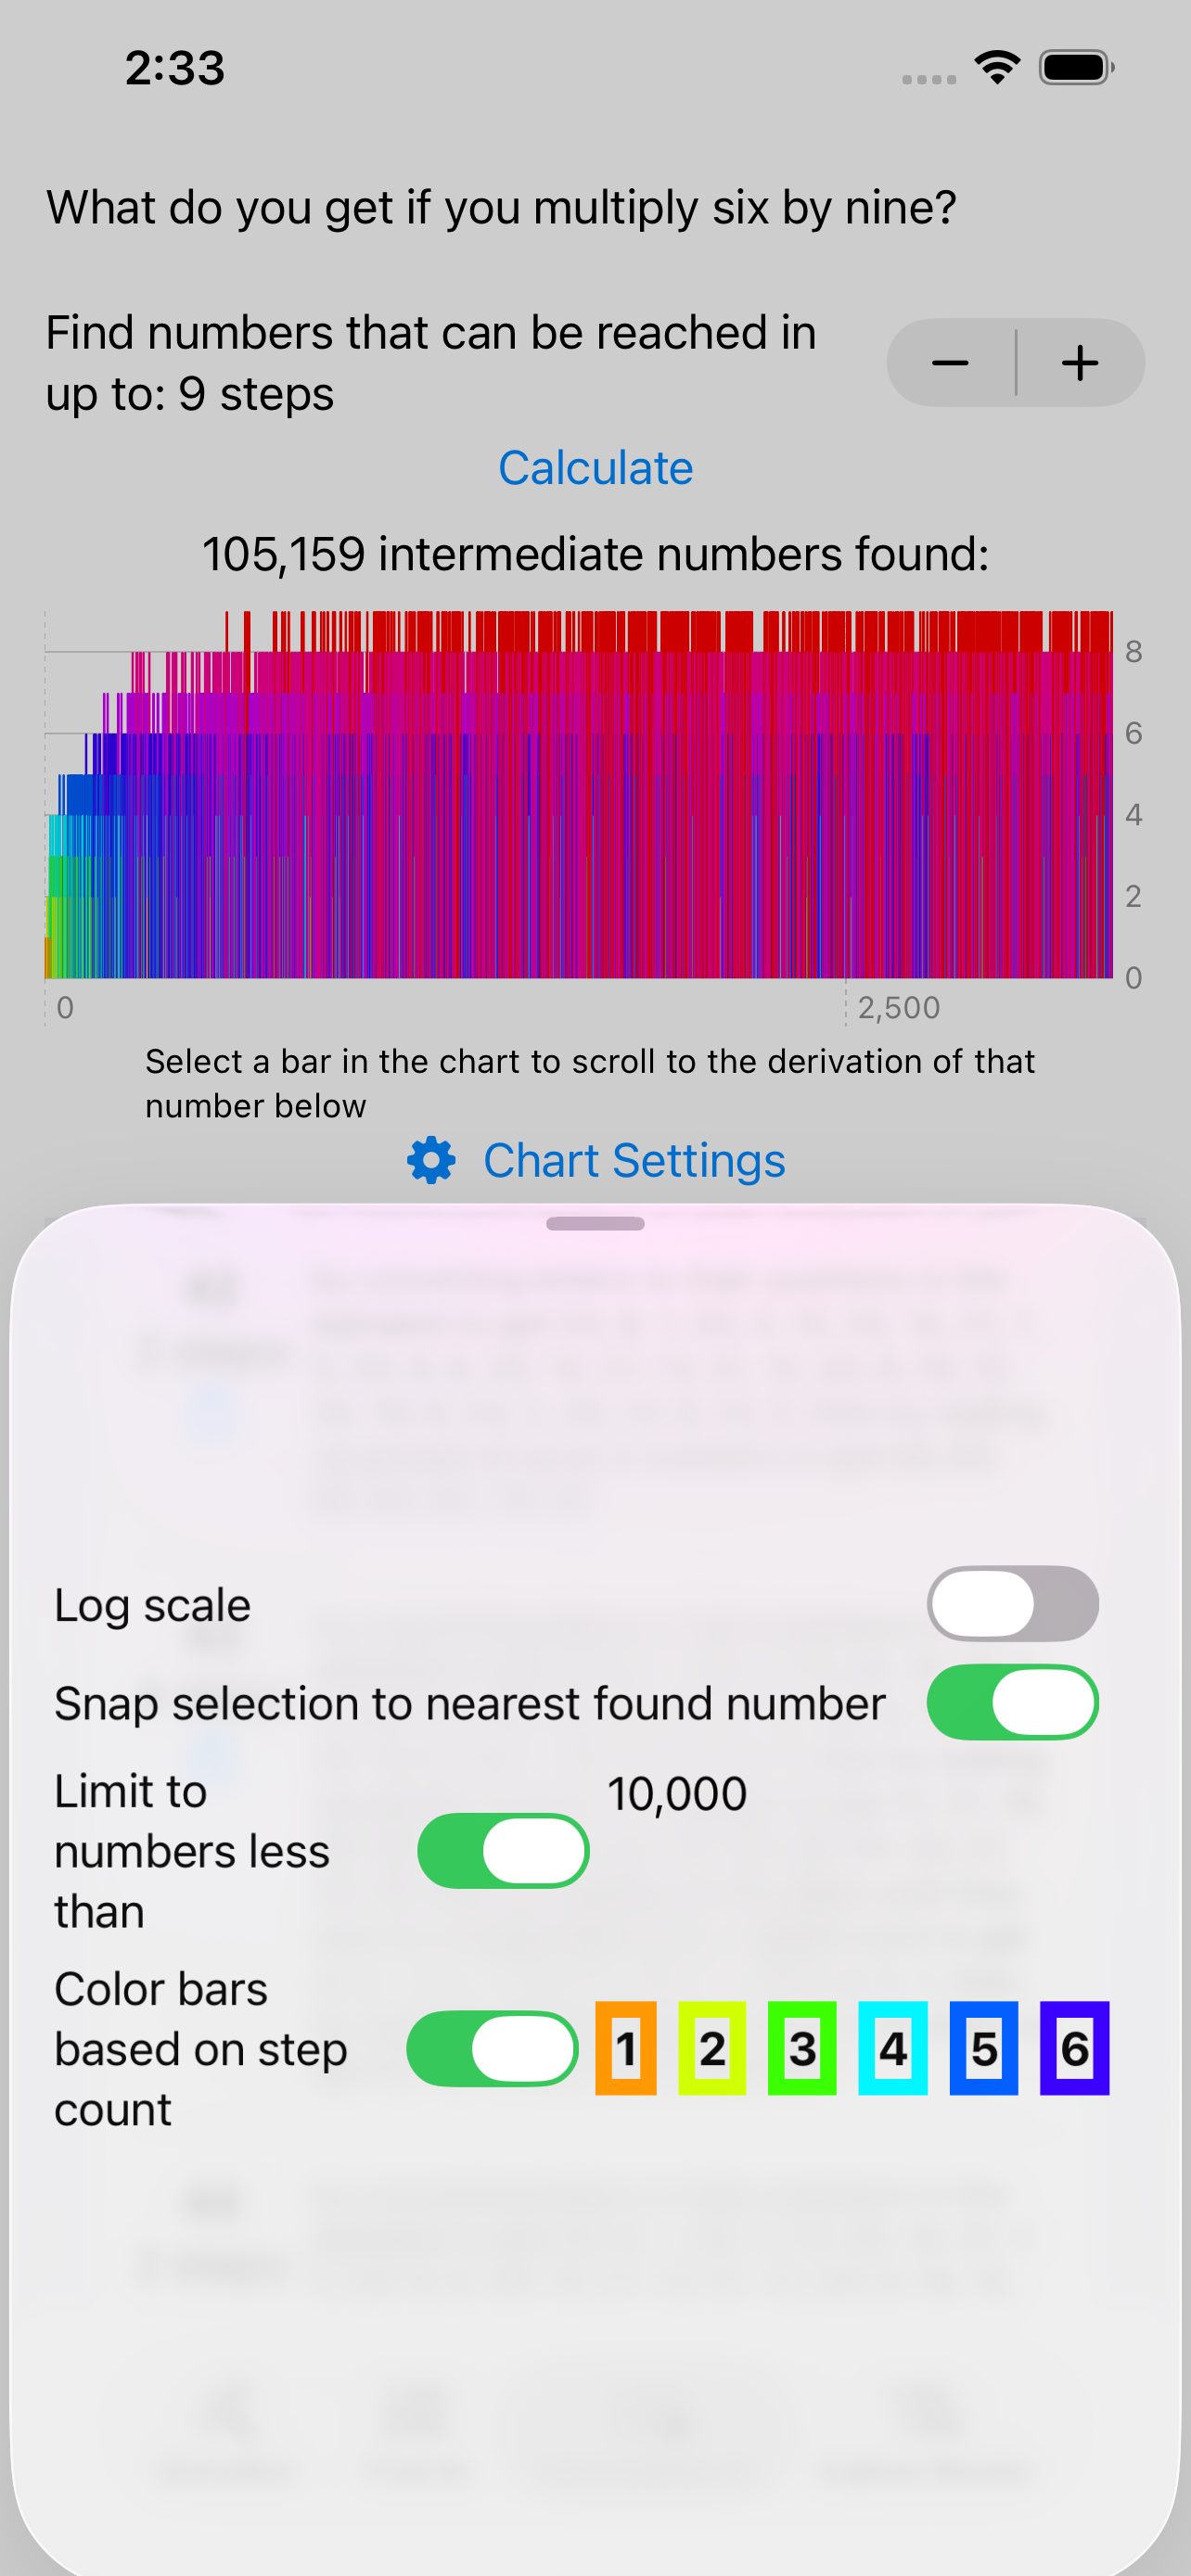
- I show charts of the numbers found, and there seems to be a bug (FB20491693, if you’re at Apple) in Swift Charts when I include more than one result that would convert to the same
Doublevalue. So I’m limited to final numbers under 253. - 13 is an supposedly an unlucky number anyway.
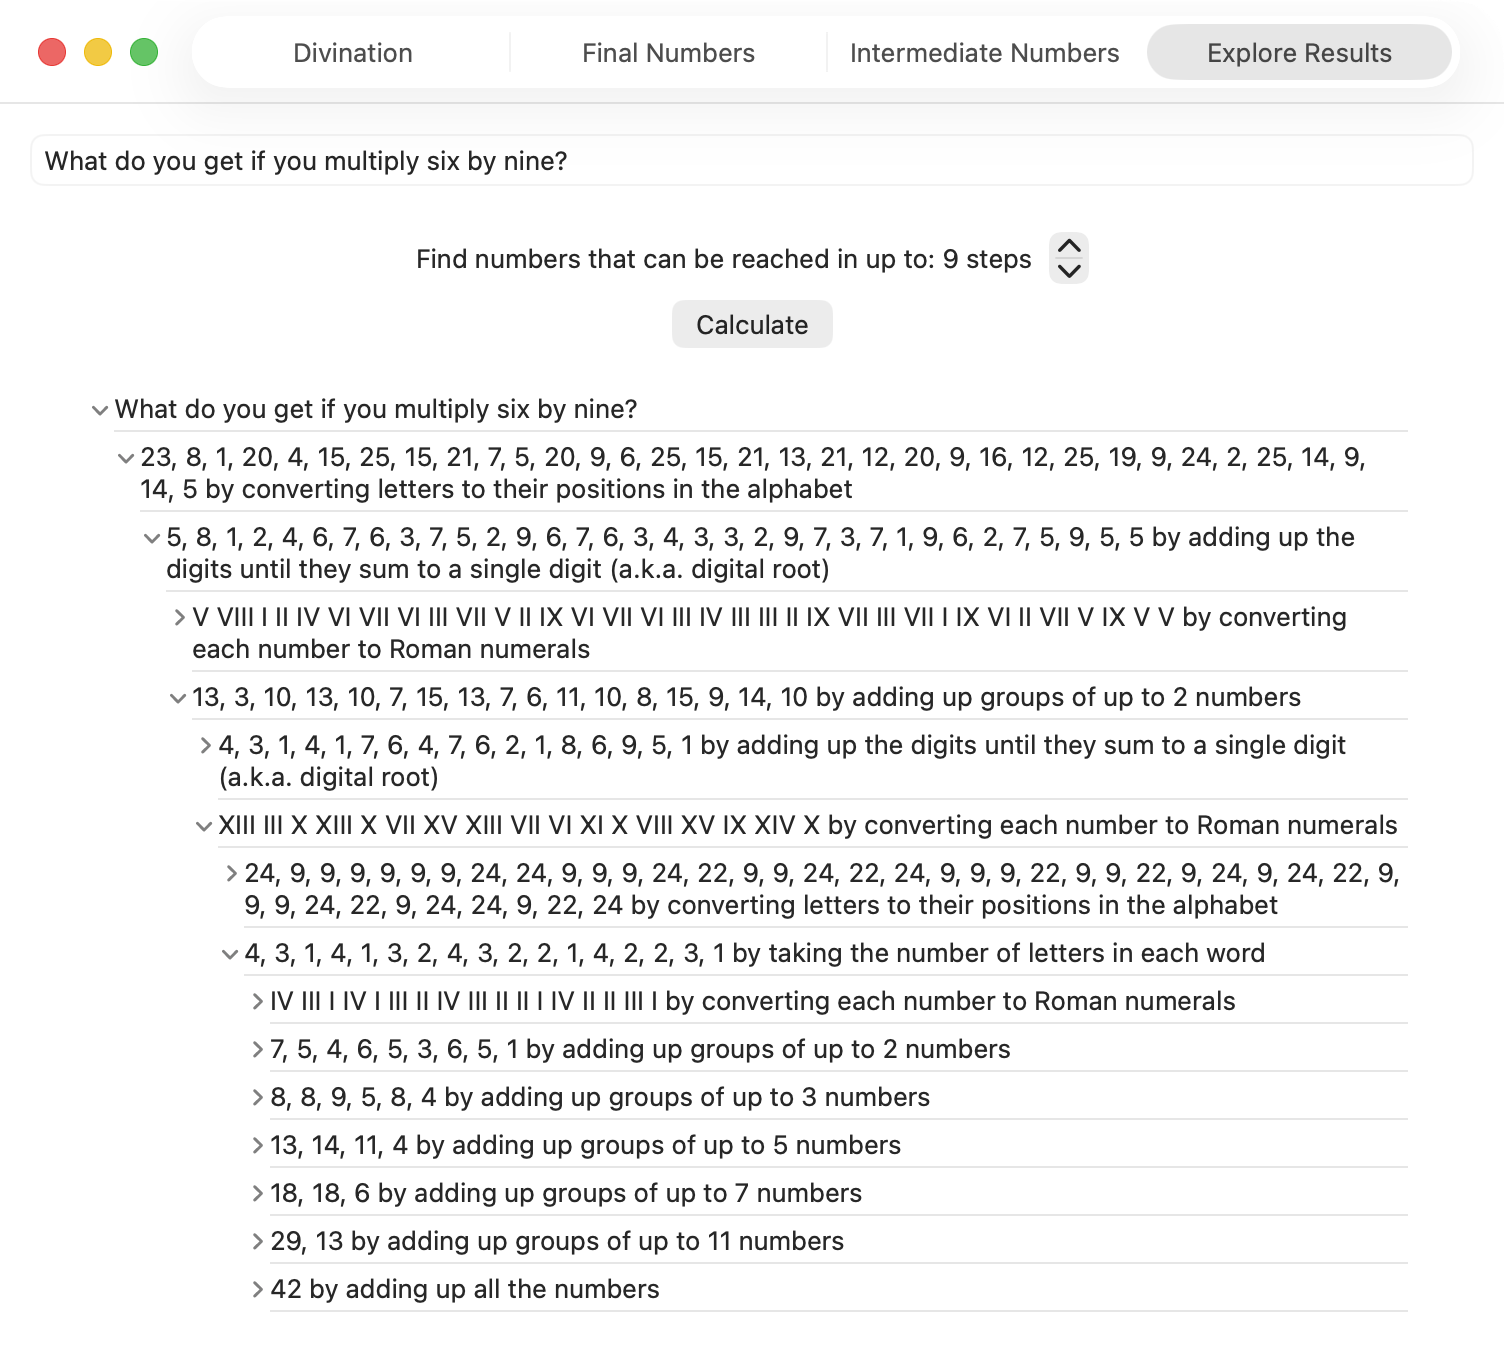
The app shows the final numbers you get when you complete enough of these steps to get down to a single number. On another tab it shows the intermediate numbers found alongside other numbers partway through the process. You can also explore the results yourself by expanding each intermediate result to see what was derived from it in the next step.
Note, there were many years between when I saw that page and when I actually wrote the app. So I don’t cover:
- Words that sound like numbers. I could have easily done something like this, at least on macOS, as I have a lot of experience with the text-to-speech APIs, but I simply forgot that was one of the tactics. Actually, I would probably just have a list of known words (too, to, for, non-rhotic Severn, etc.) that sound like numbers, or perhaps I would derive such a list by searching through a lot of text using the text-to-speech API. Uri’s suggestion of ‘hellheaven’ would not have come up though, since it doesn’t actually sound like eleven.
- Numbers that have consecutive or non-consecutive ones in them… although, this depends on how we got the numbers. If we obtained 10001 by concatenating 10, 0, 0, and 1, we would also have added those numbers to get 11.
- Stopping halfway when calculating the digital root — e.g., adding up the digits of 254 to get 11, but not continuing to add up the digits in 11 to get 2. I just take the remainder when dividing by nine to do the whole thing in a single step, so this won’t even be shown in the intermediate values.
I think that’s all I have to say about that… as I mentioned in my last post, this could also be a MathsJam talk some day. You can download the app for free on any device running macOS 26 or iOS 26. You could use it to debunk the claims of numerologists, or to make your own claims for fun — but please don’t use it to take advantage of gullible people.
James Webb Space Telescope (now actually sung) and Seddit 1.4
Posted by Angela Brett in My Software, video on September 26, 2025
In my last post I gave lyrics to a parody of an Arrogant Worms song about the James Webb Space Telescope, and an update to my text-to-speech focussed Reddit client Seddit. I also said two things that turned out to be false:
- Joey and I will probably sing this parody, but it will take more mixing and video editing than our usual songs.
- This completes all the major features I have planned the app — I have other ideas for improvement, but I don’t think they’re essential. I’m hoping that the next update will be simply to remove the text saying I’m looking for a job.
Well, the other night Joey asked if I wanted to sing the song, and I said, “Okay! I should change into a more space-related shirt first” and then Joey produced two James Webb Space Telescope T-shirts out of nowhere, having secretly ordered them previously. So we changed into the shirts, and then we sang it, directly into a camera together, with no warmup or practice, and Joey trimmed the ends and put the video on YouTube. I had thought we’d sing our separate parts, get them perfect, then mix them, and make a video with some relevant educational images. Instead, here’s an imperfect but pretty good recording already!
I know where I made a mistake, but I’m not going to hang a lampshade on it so you’ll notice.
As for Seddit, well, not only did I not get the job I was hoping for when I wrote that, I also decided to update the app to use the new Liquid Glass design language that came out with iOS and macOS 26. I found and fixed a few other issues along the way. Here are the changes in Seddit 1.4:
- Features
- Added support for liquid glass appearance in iOS/macOS 26
- Moved playback controls to a liquid glass overlay so you can see more content around the edges
- Bug fixes
- Made sure compliments purchased on the Support Seddit screen are always shown in the same order
- Made the Voices Settings screen on macOS show which voices are Enhanced or Premium (I also filed bug FB20362911 with Apple about this, because there’s some system behaviour that’s inconsistent between iOS and macOS)
- Fixed an issue introduced in Seddit 1.2 whereby posts whose comments are not all read would be shown as read instead of partly read
You can get the latest version for Mac, iPhone, or iPad on the relevant App Store.
On the subject of songs and liquid glass, check out this song by James Dempsey about liquid glass:
Thanks to Seattle Xcoders, I was lucky enough to have seen the live debut of this, and another performance of it, which I recorded but don’t have permission to share yet.
I haven’t actually had any legibility issues with liquid glass though — and if I did, I know I could always turn on Reduce Transparency.
Seddit: A text-to-speech Reddit reader for iOS and macOS
Posted by Angela Brett in My Software on August 6, 2025
A while ago my friend Brynn told me she’d love an app which would continuously read posts and comments from Reddit using text-to-speech, with minimal user interaction. This seemed like a fun project, so just after I released the macOS version of Lifetiler, I started working on it. It was indeed a fun project! And now it’s also on the App Store as a fun and useful app that you can use. It’s completely free, though if you would like to thank me for the effort, on the Settings screen there’s an in-app purchase tip jar which will give you a compliment (courtesy of NiceWriter) for each tip.

To use Seddit, you start by pressing the + button to load either a specific post from a URL, or a number of the best, hot, new, etc. posts from a subreddit. You can load more posts from other subreddits whenever you like. Then you press the Play button, and Seddit will read through the posts and comments you’ve loaded. You can configure which voice, rate, and pitch to use in the Settings, or set it up to use your VoiceOver voice settings whenever VoiceOver is running.
Seddit supports the main things that most audio apps do. You can AirPlay to another device. You can skip any posts or comment threads you’re not interested in using the buttons in the app, on your Mac keyboard or iOS lock screen, or on your headphones, for instance.
If you really want to sit back and listen without fiddling with anything, you can set up Seddit to automatically load more posts whenever it is running out of content to speak. And if you’re sitting so far back that you want to go to sleep while listening and not fiddle with the app to turn it off, you can use the Sleep Timer to have Seddit automatically stop speaking after a certain amount of time.
The posts you have loaded will be synched between devices that are signed into the same iCloud account, so you can start listening on one device and continue on a different one. Note that if you switch devices in the middle of a post or comment, the post or comment will be started from the beginning.

Since Seddit is more intended for passive consumption of discussions, it does not support commenting, or viewing images within the app. However, if you navigate to a post in the app, you can follow links to view the post, external link, or images on the web. You can also set up Seddit to skip reading posts that have only a link or image in the post body.
I always pay attention to accessibility when writing apps, but Seddit in particular was developed with the blind and low-vision community in mind. Brynn is blind herself, and let me know while testing the app if there were ways I could improve accessibility. Please let me know if you find any issues.
Feel free to download Seddit and try it out!
I’m also continuing to look for a day job, so I can afford to keep Seddit free to use. Let me know if you spot one I’d be great at!
Some debugging techniques, and when to use them
Posted by Angela Brett in News on May 10, 2025
I started writing this post in 2020 (it was last edited in August that year) but at some point decided everybody knew this stuff and there was no point posting it. Well, Stewart Lynch’s talk at Deep Dish Swift reminded me that there’s always somebody who doesn’t know something. Besides that, I originally got the idea for this by noticing things that my co-workers were not doing. I am attending James Dempsey’s App Performance and Instruments Virtuoso course at the moment, so I want to get these tips out there before I learn 100x more about the available tools.
There’s more to tracking down bugs than pausing at breakpoints or adding log statements. Here are some techniques which you might not use or might not think of as part of debugging. These are all explained from an Xcode perspective, but similar methods should exist in other development environments.
Quick-Reference Chart
This chart should help you figure out which techniques to use in which situations — ask yourself the Entomological Taxonomy questions along the top, and check which of the Extermination Techniques have a ✔️in all the relevant columns. To make the table more compact, I have not included rows for responses where all the techniques are available — for most of the questions, if you answer ‘yes’, then you can ignore that column because answering yes does not limit which techniques you can use.
More details on both the Entomological Taxonomy and the Extermination Techniques are below.

- Quick-Reference Chart
- Entomological Taxonomy
- Does the bug stay the same when paused or slowed down?
- Did it work previously?
- Do you know which code is involved?
- Is it convenient to stop execution and recompile the code?
- Can you reproduce the bug reliably?
- Is there a similar situation where the bug doesn’t appear?
- Are you ignoring any, errors, warnings, exceptions, or callbacks?
- Is the bug related to macOS/iOS UI?
- Extermination Techniques
- Any more ideas?
Entomological Taxonomy
Not all debugging techniques are appropriate in all situations, so first it helps to ask yourself a few questions about the bug.
Does the bug stay the same when paused or slowed down?
Some errors go away when you slow down or stop execution. Sometimes timeouts give you a different error if you pause execution or even slow it down by running in a debugger with many breakpoints turned on.
Did it work previously?
If the code used to work but now doesn’t, the history in source control can help you work out why.
Do you know which code is involved?
Early in the debugging process, you may have no idea which part of the code causes the error, so some techniques are less useful.
Is it convenient to stop execution and recompile the code?
If it takes a complicated series of steps to reproduce a bug, or if it only happens occasionally and you’ve just finally managed to reproduce it, or if your code just takes a long time to compile, you’ll want to debug it without stopping to make code changes.
Can you reproduce the bug reliably?
This one is pretty self-explanatory — if you know how to make the bug appear, you have an advantage when trying to make it disappear.
Is there a similar situation where the bug doesn’t appear?
If you can not only reproduce the bug but also know of a similar situation when the bug doesn’t occur, debugging is more of a game of spot the difference. This is where diffing tools could help.
Are you ignoring any, errors, warnings, exceptions, or callbacks?
Have you heard the expression ‘snug as a bug in a rug‘? Sometimes the cause of the bug is right there under the rug where someone swept it.
Is the bug related to macOS/iOS UI?
UI issues are harder to unit test, but there are a few techniques specific to macOS/iOS user interface.
Extermination Techniques
Here are some debugging methods I know about. Most of these methods are available in many different environments, but I’ll be describing specifically how to use them in Xcode. Feel free to comment with other methods, and perhaps I’ll include them in an update post later.
The Debugger
Ah yes, the most obvious tool for debugging. The debugger is particularly useful when it’s not convenient to stop execution and recompile. You can also share your breakpoints with other developers through source control — a fact which I did not know until I started writing this post. I initially had the question ‘Do other developers need to debug the same thing?’ in the Taxonomy section, but I think all these techniques work either way.
Interactive breakpoints
This is what you probably first think of when you think of breakpoints. It’s what you get when you click in the gutter of your source file. When the breakpoint is hit, execution stops and you can examine variables (in the UI or with the p or po commands), the stack, etc, and run code using the expr command. See Apple’s documentation for more information on adding breakpoints and what you can do with them.
Automatically-continuing breakpoints

If the behaviour changes when you pause in the debugger, you can still use breakpoints to log information or run other commands without pausing. Secondary-click on a breakpoint to bring up a menu, then choose Edit Breakpoint to show the edit pane. Set up a Log Message or other action using the ‘Actions‘ menu, and select the ‘Automatically continue after evaluating actions‘ checkbox to prevent the debugger from pausing at this breakpoint.
You can use the search box at the bottom of the Breakpoint Navigator to find which breakpoints any logged text might have come from.
Unless the debugger itself slows down execution enough to change your app’s behaviour, this is better than using log statements. You don’t need to stop execution to add logging breakpoints, and you are less likely to accidentally commit your debugging code to source control.
Symbolic breakpoints etc.

The kinds of breakpoints above are great if you know which code is affected. If you don’t know that, you’ll find some other kinds of breakpoints in the menu that pops up from the + button at the bottom of the Breakpoint Navigator.
These will stop at whatever part of your code certain kinds of issues happen.
Constraint Error Breakpoint in this menu can be useful for debugging UI issues when you’re using AppKit or UIKit.
Debug View Hierarchy

If your UI layout is not how you expect it to be, you can use the Debug View Hierarchy button![]() on the debug bar to see exactly where and what size each view is. You can drag the representation of the view hierarchy around and look at it from the side to see how views relate to the views behind them.
on the debug bar to see exactly where and what size each view is. You can drag the representation of the view hierarchy around and look at it from the side to see how views relate to the views behind them.
Code Changes
If it’s convenient to stop execution and recompile the code, you can make some code changes to help you track down bugs.
Unit test to reproduce bug
If you can write a unit test that reproduces the bug, you can run that in the debugger to find out what’s going on, without the hassle of going through multiple steps in the UI to set up the buggy situation. It will be much quicker to find out whether your fixes work, and to make sure the bug stays fixed later.
UI test to reproduce bug
Same as above, but this can be more useful than a unit test if the bug is related to UI layout. It also works even when you don’t know which code is causing the issue.
Ad-hoc log statements in code
Ah, our old friend print/NSLog… a common quick go-to when debugging. In general I would recommend using breakpoints instead (either interactive, or logging the data you would have printed and continuing) because you can add them without recompiling, and you don’t have to remember to remove the logging later. But in some situations, even running in the debugger can slow down the code enough to change the behaviour, so you might need to use logging.
You can also use logging APIs or other telemetry solutions for recording what happens in your app in a more structured and permanent way, but that is outside the scope of this post.
Adding all optional error handling
If you’re calling any functions which can throw exceptions, or return errors (either using an optional error parameter, or a return value) or nil where that would be an error, make sure you’re checking for that. If you have control over those functions, change them so that it’s impossible to ignore the errors. I once fixed an error which had been plaguing my co-workers for years, just by passing an optional error parameter into a system function and checking the result.
Fixing compiler warnings
If you have any compiler warnings, fix them. If you’re debugging a specific issue, first fix the warnings in the relevant code and see if it helps.

Later, whenever you have more time to work on technical debt, fix all the rest of them. Then set ‘Treat Warnings as Errors‘ to YES in the Build Settings of your target. Then search for ‘warnings’ in those build settings, scroll down to the Apple Clang – Warnings sections, and gradually turn on more of the optional warnings. You can use a tool such as SwiftLint to warn about even more things, such as force unwrapping, and then fix all of those warnings. If you’re using Swift 5, enable Complete concurrency checking, fix all of the warnings that gives you (if you’re new to Swift Concurrency and don’t fully understand what the warnings mean, I found these videos from WWDC 2021 and WWDC 2022 gave a useful overview) then upgrade to Swift 6.
Your compiler can find potential bugs before they happen, so you never even have to debug them. Put it to work!
Git
If the code used to work, chances are you can use git (or whatever source control system you’re using) to figure out when it last worked and what change broke it.
If you find the commit that caused the issue, and the commit message mentions a ticket number, check the requirements in the ticket and take them into consideration when fixing the bug. Sometimes I have found out that a reported bug it really isn’t a bug, it’s a feature that was forgotten about! Other times, it’s a real bug but it has to be fixed very carefully to avoid breaking a feature or bringing back a different bug.
Git Authors
If you know pretty much where in the code the bug probably is, then even if you don’t know when it broke, you can see the latest changes in those lines of code. Switch to the source file in question, and show the Authors view using Authors in the Editor menu. You will see a new sidebar with names, dates, and (if there’s room) commit messages relating to the latest change in each line in the source file.

If you click on one of these commits, you can see more information about the commit:

Tap on Show Commit to see what changed in that commit. Maybe you’ll see how it caused the issue.
Note, this feature is also known as git blame, but Xcode calls it Authors, because we shouldn’t feel bad about having written code, even if we did cause a bug.
Git file history

If you know which file the issue is probably in, but not necessarily which part of the file, you can see the history of the file by opening the History Inspector with View → Inspectors → History.
You can click on each change and get a popup similar to the one above, where you can click Show Commit to see what changed.
Git project history
If you have no idea which code could cause the issue, but you have a good idea of when the issue was introduced (this is starting to sound like quantum physics) you can look at what changed in the whole project during the likely time interval. I usually do this directly on the GitHub website for projects that are using GitHub, but it looks like you can also see the list of changes by selecting a branch in the Repositories section of the Source Control navigator in Xcode.
Git Bisect
I’ll be honest; I’ve never actually used git bisect, even though I remember hearing about bisection before git even existed. But it seems like a very efficient way to find which changes caused a bug! It essentially lets you do a binary search of your commit history to find the problematic commit. Combined with a unit test to reproduce the bug, this could be very quick.
Diff
The above section covers looking at what changed if some code used to work, but doesn’t any more. But if instead the code works in some situations but not others, you can still compare things using a diffing tool. I tend to use FileMerge, because it’s installed by default. I usually search for it in Spotlight and open it directly from /Applications/Xcode.app/Contents/Applications/FileMerge.app, but I just noticed you can open it from the menu in Xcode using Xcode → Open Developer Tool → FileMerge.
Code diffing

If the code for a situation that has a bug looks similar to the code for the situation which doesn’t have a bug, copy the relevant code into two text files (or paste it straight into your favourite diffing tool) and see what’s different.
Tip: Once you are sure of exactly what’s different between the two pieces of code, you might also want to refactor to reduce the code duplication. Even if you’re not debugging, if you ever find what looks like duplicated code, always run it through a differ to make sure it’s really identical before extracting it to a function or method.
Log diffing
If the buggy situation uses mostly the same code as the non-buggy situation, but some data or behaviour causes it to behave differently, you can add logging (either logging breakpoints, or print statements, as discussed above) to show what is happening at each step. Then use your favourite diff tool to compare the logs for the buggy situation with the logs for the working one.
Any more ideas?
These are some of the debugging techniques I use all the time. But just as I’m betting that someone out there doesn’t know them all, I bet there are more debugging techniques I don’t know about which seem basic to other people. What are yours?
Lifetiler for macOS: it’s like a temperature quilt for your life
Posted by Angela Brett in My Software on November 13, 2024
TL; DR: I wrote a macOS app called Lifetiler that can be used to chart your life with an emoji or colour for each day, and you can download it here.
If you’ve been following me for a while, you know I was in a long-distance relationship with Joey Marianer for several years. We met on JoCo Cruise, communicated a lot on FaceTime, and visited each other a few times a year when possible. Eventually we got married, and two and a half years later we moved in together.
On 7 August 2022, I had several hours to spare in an airport business lounge after Joey had left, so I started writing an app called Lifetiler to chart how many days we’d been together in-person. As I write this on 12 November 2024, we’ve been together in-person for 323 days of the 2811 days we’ve known each other, in 15 contiguous stretches. That makes this our 14th date, since we didn’t start dating until the second time we met. We’re on track to have been together in-person for 365 days on December 24.

But I digress. I don’t need to keep track in the app any more, because we live together! But I’ve continued working on the app to make it usable for people who aren’t me, and now it’s on the App Store. For now it’s $2.99 in the US store, because that’s <3, which makes a heart. ❤️ Whether the price stays that low depends on how soon I get a day job.
In the app you can date ranges with colors or emoji indicating what happened on those days. You can then export a chart as an image or a series of emoji. You can choose how many days to show per row or column, and the app will suggest numbers that will give you a full rectangle without gaps at the end. Here is an image chart of Joey’s and my first 256 days together in-person:

Here I’ve chosen a white background for the image overall, and a pale pink background around each emoji. Dates where we weren’t together (i.e. dates which aren’t included in any date ranges) are dark grey squares.
In an text (emoji) export, colours will be converted to the closest square emoji. I’m not going to paste the emoji version of the Joey document inline because it’s quite large, but here it is as a file:
It’s also possible to show the same document in a ‘simplified’ mode, with the same colour or emoji for all days that are within date ranges — so in our case, I used a heart for every day we were together. In this chart I used light grey background for the whole thing, no background for individual emoji, and blue squares for the days we weren’t together:

You could use Lifetiler to chart long-distance relationships, where you’ve traveled, daily progress towards goals, the timeline of a novel you’re writing, a roster, your moods, symptoms, or anything you can reduce to an emoji or colour per day. It’s a document-based app, so you can have separate documents for whatever you want to chart. I’d be quite interested in knowing what you use it for! If you’re unsure what the most important thing to show on a given day is, you can have overlapping date ranges, so there’d be more than one emoji or colour on a given day, then choose which one you want shown in an emoji or image export.
I developed Lifetiler as a multi-platform SwiftUI app, which means I can easily make an iOS version which will open the same documents. That’s one of the next things on my to-do list, but since I’ve personally been using the app mainly on macOS, I would like to do substantial testing on iOS before I release it.
Here’s that App Store link again so you don’t have to go looking for it now that you know what the app does. Enjoy!

This work is licensed under a Creative Commons Attribution-Noncommercial-Share Alike 3.0 Unported License.
Please tell me if you do something cool with it.

